It is important to know How to createElement in JavaScript, why? One of the most important things JavaScript does for us, is change HTML elements that the user sees. This means that we need to know how to create elements, how to modify elements. In this article, we show how to add new elements on the screen. But here at CodeBrainer we also show techniques on how to make modifications.
We will be looking at:
- What is DOM?
- createElement method
- Other DOM methods we need to mention
- createElement in JavaScript examples
- We need an HTML to create new elements in
- Adding the first element
- Create an element inside a chosen element
- How do you create elements with attributes?
- innerText vs innerHTML
- Adding a CSS style class to an element using JavaScript
- How can we insert an element before an existing element
- Creating nested elements with JavaScript – Adding a list with JavaScript
- Having fun and adding 100 buttons
What is DOM?
DOM or Document Object Model is a way of communicating with HTML elements within a web page. DOM provides functionality for searching, modifying, removing elements within an HTML document. We also have the ability to search for elements and count them. Elements are represented as a tree of nodes.
DOM is an interface provided to us by browsers and is not a part of the JavaScript language. But what a great service it provides. We can’t even imagine modern web pages without using DOM.
createElement method
createElement method creates a new HTML element within DOM. When calling the method, you have to provide a tag name that defines the type of element we create.
var element = document.createElement(tagName[, options]);
tagName can be any of the HTML tags you know, like p, div, span,… (read more about HTML tags).
Parameter options is optional, it enables us to set an is attribute when adding an element. is attribute enables us to change the behaviour of HTMLElement, and it means that we would have to write a custom class for it. This is a more advanced topic, that we do not cover in this article.
How would it look like to create a paragraph?
document.createElement("p")
This is it, but you need a few more steps to make it work, see the example below for a detailed explanation.
Other DOM methods we need to mention
appendChild is a method of a Node, it appends an element to a given element. This is an essential method for actually adding elements to the HTML document. We call it after the createElement method and finalize the creation of the element. We can add the new element.
insertBefore is a similar method to appendChild but it inserts an element before the given element, this enables us to position the element within the document structure. We can also use the insertBefore method to add elements to the document.
removeChild is a bit more destructive method since it returns an element from the document, but it is essential to enable us to build dynamic web pages, imagine, that you add an item to the basket in an online store and then change your mind, removeChild would make it possible to remove this item from the list of items in the basket.
createElement in JavaScript – examples
We try to explain all the code using colorful examples. This time we prepared quite a few examples for you to better explain what createElement in JavaScript does. We give you the essential HTML document in advance, but you have to build the JavaScript code yourself, step by step to learn even more.
We need an HTML to create new elements in
An HTML document serves two purposes, the first is to show all the buttons we need to execute all the examples, second is a placeholder for adding new elements.
The HTML is structured in a way that it has a console with buttons and a counter on the top and a placeholder for elements below, it looks something like this:
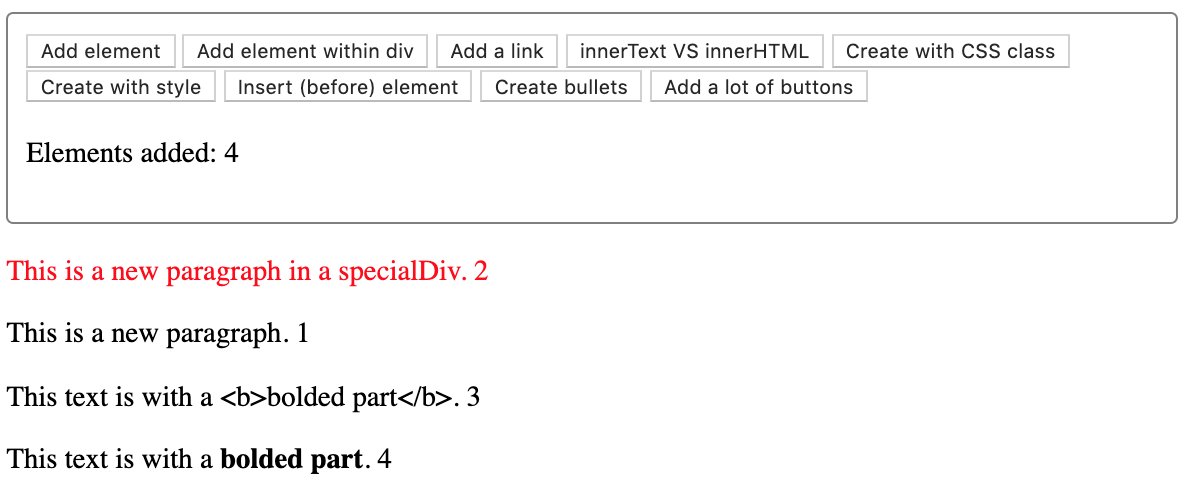
You can see that we even added a counter, this way you always see where new elements are positioned.
HTML linking all the components together
Explaining how to create elements in JavaScripts will have 2 parts, one is an HTML document and the other one is a JavaScript file with code. We need to connect them both:
Link to JavaScript file
HTML

Remember, that you need to put createElement.js into the js folder. Or adjust the values in order for it to work.
Styles to make new elements different
We do not need a lot of styles for this example, that is why we put them in the head tag.
HTML style for our example
HTML
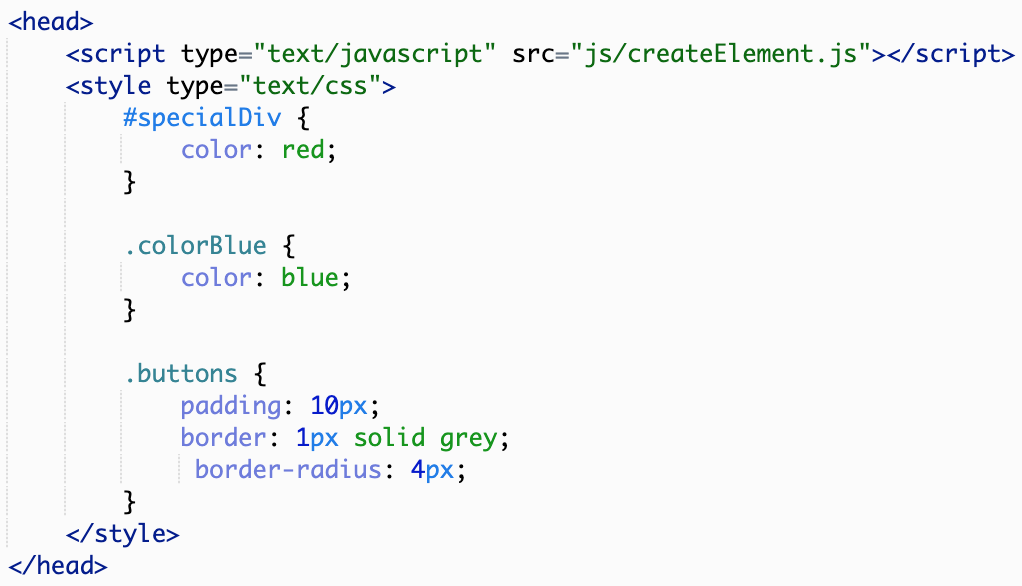
The first CSS is defined for the element with the id specialDiv (we define this with # in front of the id) and it makes fonts in this div red. This way it is apparent where a new element is created. If it is red, it was created inside specialDiv.
Next is the CSS class colorBlue, all this class does is make the font color blue, again to make it apparent that we added a style using the createElement in JavaScript, followed by adding a CSS class to the new element..
Last class is named buttons, it is used for our buttons dashboard at the top of the document, just to make some spacing and add a border, to separate created elements from existing elements from the HTML document.
Adding all the buttons
There are a lot of buttons for this example, all you need to know is that buttons are there only to execute functions written in the JavaScript code. Names for the functions are very self-explanatory and we also explain each function step by step below.
Button HTML tags - buttons to run the examples
HTML
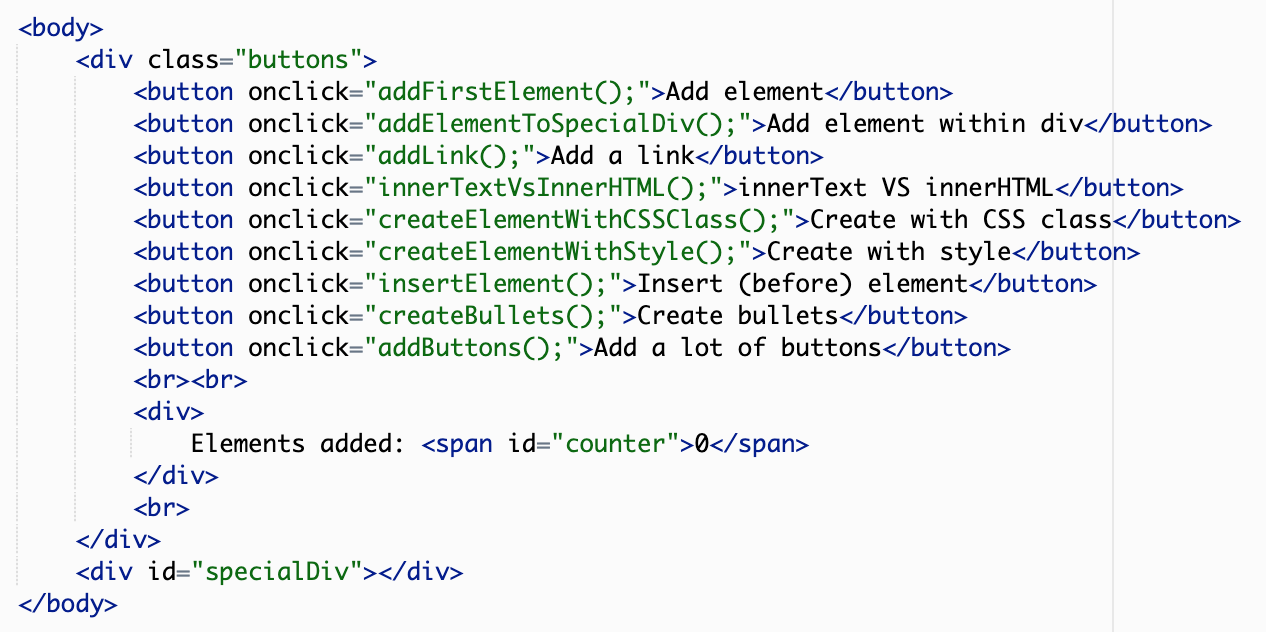
At the end there is a div for the counter.
Counter - number of elements added
HTML

The important thing is that we add the id to the span tag, this way we can find it in JavaScript using another very useful method from DOM called getElementById.
div to place elements in
Most of the elements we place directly into the body element, but to showcase how we can structure the document we place some of them directly to the specialDiv. That’s why we need an HTML code for it.
Elements placeholder
HTML

With this we conclude our explanation of the HTML document we use to createElement in JavaScript.
Final HTML
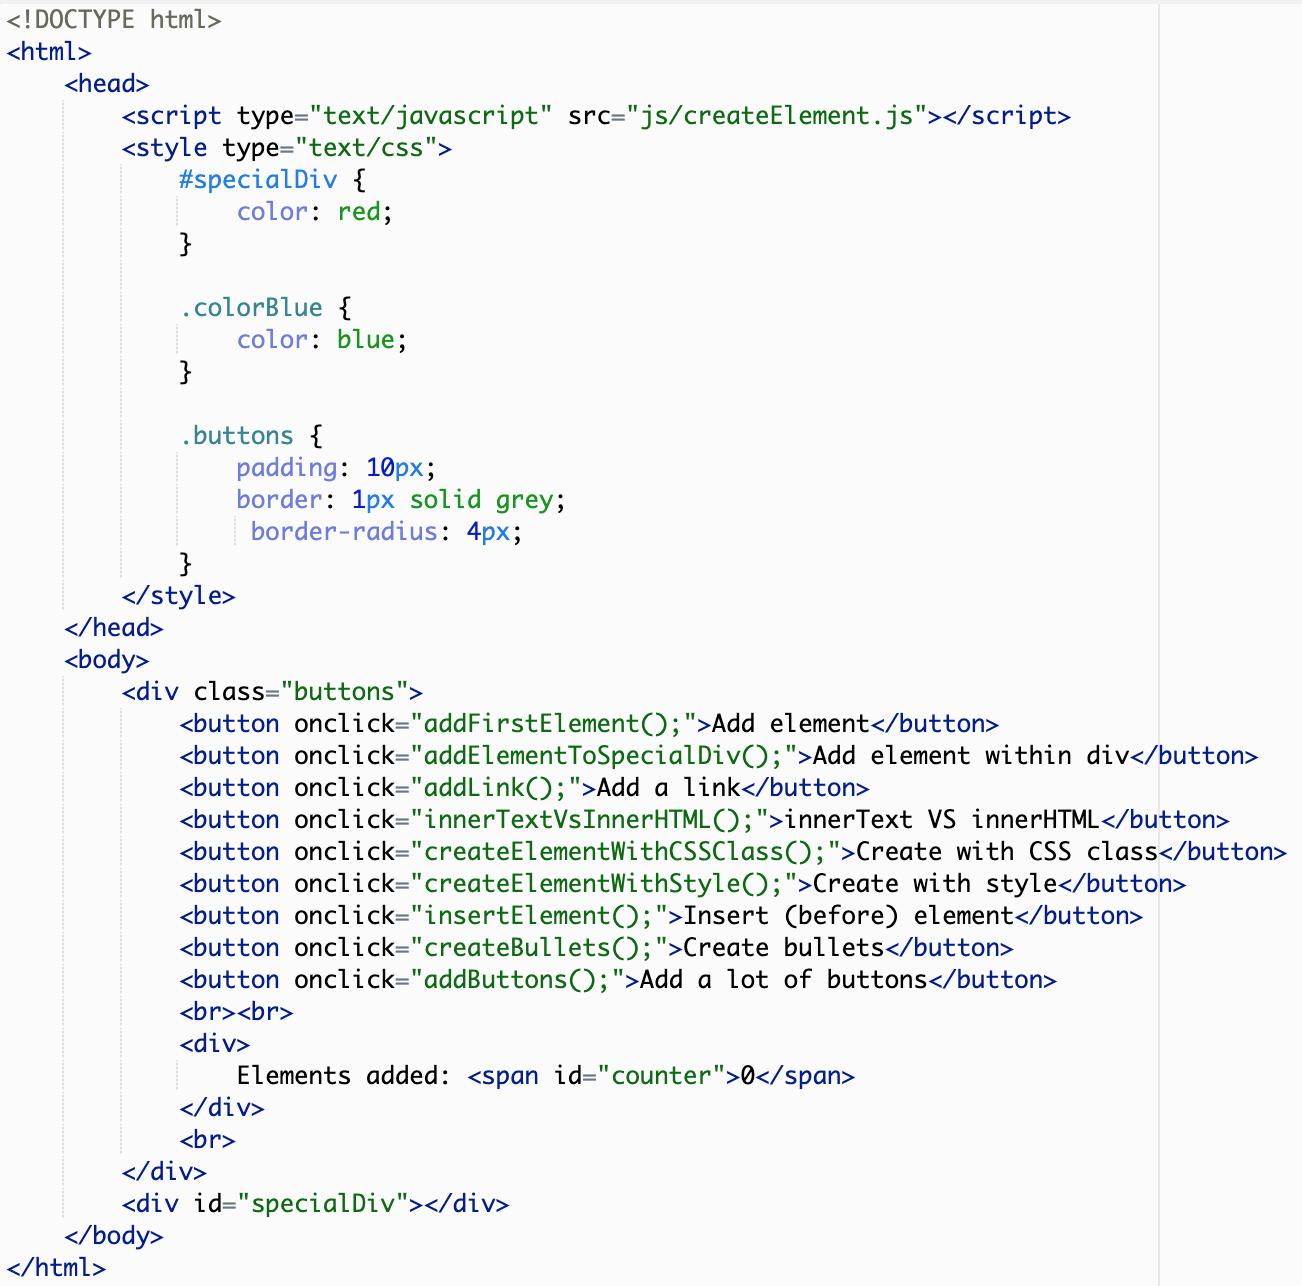
Here you can see the complete code.
Complete code for HTML part
HTML
Adding the first element
We smartly call our first function addFirstElement since we are adding our first element.
Let's add first element using createElement method
JavaScript

What this function does is, it creates an element and stores it in a variable named newParagraph. We need this variable to work with the element further.
Add another paragraph
JavaScript

Next we set the text for the element using innerText property. There is a twist to setting text to the element. We append a string returned by the function getCounter.
Add text for the paragraph
JavaScript

getCounter is a function that returns the current count for elements on the page and increases by one, for each element. Using the counter we can see where the elements are added on the page. The getCounter function is explained below.
Last thing is adding an element to the node tree of the body. We do this using the appendChild method of document.body object.
Add the paragraph to the document's body
JavaScript

Create an element inside a chosen element
How do we create an element using JavaScript inside the selected element? As simple as adding an element to the body object, all we have to do is retrieve the element from the nodes within DOM; for example using the getElementById method.
Create element inside another element
JavaScript

You can see that we also use the getCounter function here to indicate the order in which elements are added to the document.
Since we are adding an element into specialDiv, we call the appendChild method on the element stored in the variable specialDiv.
Using appendChild
JavaScript

How do you create elements with attributes?
We can not add attributes directly with createElement in JavaScript. To do that we need a few more steps. This is best illustrated using an example that adds a link, that has a link and opens in a new window.
createElement js 03
JavaScript

The great thing about manipulating elements using JavaScript is that we are interacting with a reference for that element and we can change anything.
In this case we can use the setAttribute method to add an href attribute. The value is a URL that points to the location we need to show.
Setting href attribute for the link
JavaScript

Same goes for the target attribute that instructs the link to open in a new tab/window when the user uses it. Just remember to use the _blank value to implement this behaviour.
Remember to add an element using appendChild at the end.
innerText vs innerHTML
We are using innerText and innerHTML functions a lot when manipulating HTML documents using JavaScript. The difference between this two methods is best shown on an example.
Using innerText and InnerHTML
JavaScript

The whole difference in creating two elements newParagraphText and newParagraphHtml is that we use innerText for the first element and innerHTML for the second element.
The code is somewhat similar, but what is shown on the screen is very different.

As you can see in the image above using innerText we get a text without styling and parsing of the HTML code. When using innerHTML the given value is interpreted and rendered as an HTML, this enables us to add styling and even nested elements using an HTML code.
Adding a CSS style class to an element using JavaScript
So how do we add a CSS class to a newly created element?
Adding CSS class name
JavaScript

There is a property called classList that returns a list of CSS classes used to style a given HTML element (read more about CSS). This list also has a method called add, we use this method to add another class to the list. In our case we make the font color blue using the colorBlue class. We prepared the CSS class earlier in the HTML style tag seen above.
Set custom style for an element using JavaScript
We can set a custom style as well, using JavaScript and create stylish elements on the go. This principle can also be used for existing elements when we want to manipulate the elements on the screen.
Setting custom style for the element
JavaScript

Style is a property used to get the so-called inline style for elements, it can be used to make custom styles without using CSS classes. Modern development advises us to use CSS classes whenever possible, but it is important to know how to change the style for a single element as well.
Change the color and font size
JavaScript

Using style you have access to CSS properties, you can see that we changed the color of the font to green.
We also added a font-size CSS property to showcase how the name changes if you want to use it in JavaScript, and in this case the property name is fontSize (dash in a CSS class name implicates upper case for each word).
As before, do not forget to use appendChild to actually add a new element to the page.
How can we insert an element before an existing element
We have an insertBefore method that enables us to insert a new element in front of the existing one.
Insert element before an existing element
JavaScript

Most important thing that changes is that we also need a reference to an element, where we want to insert a new element, in our case this is specialDiv, one more time that specialDiv comes in handy.
insertBefore method
JavaScript

At the end, the code changes in so that we use the method insertBefore. We also need to specify the element to insert before, specialDiv.
Creating nested elements with JavaScript – Adding a list with JavaScript
We know now that we are able to use createElement in JavaScript for adding a single element. But how about nested elements or let’s say a list, with <ul> as a main tag and many <li> tags underneath <ul>.
We like to call an unordered list by the way they look with bullets in front of each list item. Knowing this we now write a function called createBullets that will showcase how to make a list..
How do we create a list (nested elements)
JavaScript
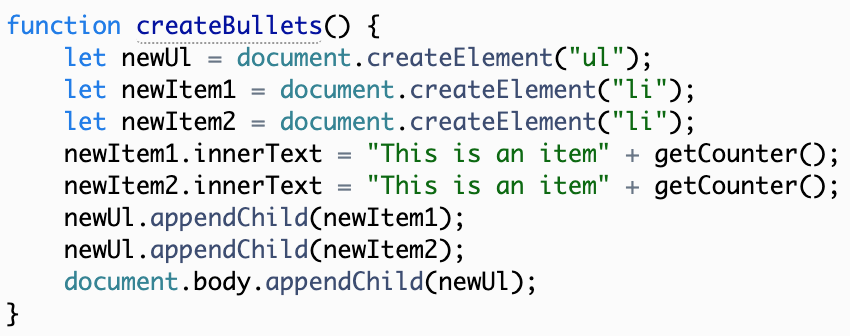
In most cases we would use some kind of loop to iterate all the list items (check our blog post loops in JavaScript), but we only need to showcase the change in adding a list item to the screen.
We create an element for the ul first, and store it in a variable called newUl, this way we have a way to add new elements to our list. The code for adding a list item to the list is somewhat similar to adding a body, all that changes, that we call appendChild method on variable newUl.
Add new list item
HTML

Calling appendChild on newUl instructs the DOM to place the list item within the list.
Again we must not forget to append the list to the body itself.
Having fun, adding 100 buttons
We saved the best for last. Now we will add a function that creates 100 buttons. Yes, a hundred buttons. On top of that, all the buttons have the ability to remove themselves from the screen. This makes it fun to click every button and see them disappear. We know you already learned a few ways to create elements in JavaScript, now we use this knowledge in this function. Let’s call it addButtons.
Adding buttons with a loop
JavaScript

We start the function with a for loop that iterates from 1 to 100 and stores that value in variable i.
Assign an ID for the button
JavaScript

We assign an id to every button this way we can find it later in the function that removes the button from the web page. Id is a string with a prefix “button” and a counter for each button out of 100.
We explain how to connect the onclick event below.
This time we will change the background color of the buttons using custom styles (explained above), to make them different from our buttons in the dashboard for examples. At the end we call appendChild to add a button to the DOM. For more fun lear how to create a contact form in JavaScript.
How do we connect onclick event and newly created elements
We can show how to add an onclick event with a function on a simple example, that calls remove function for a given button.
Adding a onclick event
JavaScript

We define the function or event differently as in HTML, where we write a function in a string for the attribute onclick. In JavaScript instead of a string, the function is a real function, that is an actual JavaScript code. It seems a bit more complex but it opens a whole new list of possibilities for us. For now we only add a simple function that calls the removeButton function. For the parameter we provide the value of the newButton.id, that is the value for the current button in the loop.
How can we remove element from web page using JavaScript
We use the function removeButton to remove the button from the web page, but how does it work? We need to find an element on screen using getElementById method. Then we call removeChild method on the body using the button reference (variable).
Remove an element
JavaScript
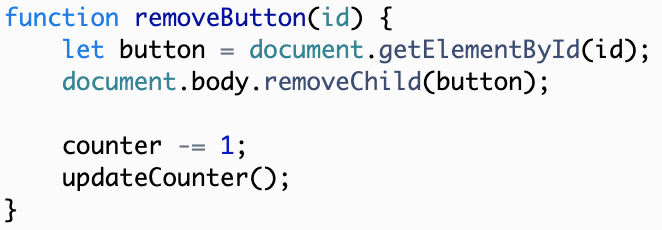
At the end we decrease the counter value and update it using the updateCounter function, that updates the value on the web page. This part is only for the counter and does not remove the button.
Functions for the counter
During the whole article, we use a function called getCounter, that increases the counter by one and returns a string for the counter to append to texts of our elements.
getCounter function
JavaScript
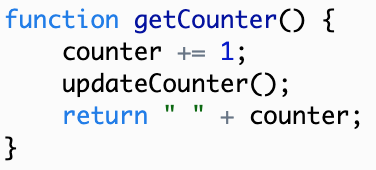
This function is a simple one. One explanation may be that counter += 1 in JavaScript is equivalent to counter = counter + 1.
The getCounter function also uses the function updateCounter, this function finds the counter element in the DOM and updates the value for us. This way we can update the counter when removing a button as well.
Display elements counter with updateCounter function
JavaScript

Conclusion
Method createElement in JavaScript gives us a lot of flexibility, and once you master all the ways you can add an element on the web page, you will have all the knowledge needed to manipulate the web page in any way you want.
Using this knowledge you can make a dynamic basket for your online store, you can add dynamic calculations to your product presentation website, add interaction for users in any way you can think of.
We featured quite a few examples, let us know what you think, how can we help you even more. And remember to have fun coding with CodeBrainer.